Split Roof in Revit
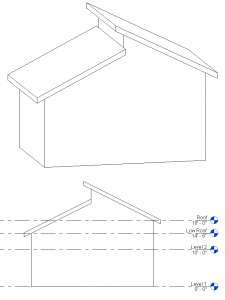
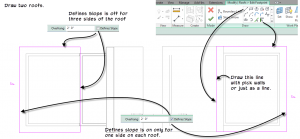
I noticed a post on the Revit Users Forum on LinkedIn today, and I thought I would create a quick reply. The original poster wanted to create a split roof. They created a link to some images which you can see in the original post. To create this kind of roof, start by making two separate roofs. I went ahead and made a level for each one, but you don’t have to, I just think it is nicer that way. Basically you create two shed roofs. So make sure that the defines slope checkbox is checked for only one edge on each roof. For the split part in the middle, you can use either pick walls or just draw the line while in sketch mode. I like pick walls because it will stay attached to the wall when the design changes. Here are some images:
Here is a link to the Revit File.
6 Responses to Split Roof in Revit
Comments are closed.
Categories
- Off Topic (1)
- Project Soane (2)
- BIM After Dark (Revit Kid) (2)
- Tips and Tricks (29)
- Oddities (5)
- Book News (23)
- Video Training News (7)
- Speaking Engagements (5)
- Renaissance Revit (12)
- Off Topic (8)
- Revit Concepts (1)


[…] Paul Aubin quickly explains Split Roofs. […]
We just did this same shed design for a client of ours.
Cool. Did you do it the same way or did you use one of the other methods? Some have suggested Slope Arrows, others have suggested an Extrusion Roof. There are a few ways to do it.
[…] Paul Aubin quickly explains Split Roofs. […]
Hi, Trying to figure out a way to have a square cut at the top of the shed roof, as opposed to the plumb cut as shown.
You cannot do this directly on the roof. However, on the Architecture tab, on the Opening panel, click the By Face opening tool. This will let you sketch an opening on the face of the roof. Make it a rectangle the entire width of your shed roof at the top edge. When you finish the sketch it will cut it square. Hope that helps.