BIM-tastic
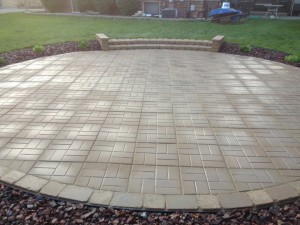
I have been working on a “little” backyard project this past week. About a month and a half ago, we had our above ground swimming pool removed. It was a 21 foot round pool. So we were left with a 21 foot round hole in the backyard. It seemed a shame to just fill it in and put sod over it, so I decided to build a patio. After getting some price quotes that were a little out of my budget I decided to do the work myself (what did I commit myself to?).
Now I don’t know how often people use Revit to create their patio plans, but if Steve Stafford can do his PowerPoint slides in Revit, then doing a patio plan in Revit does not seem all that strange? Right? So you might be thinking, well there isn’t that much to plan, it’s a circle and it’s flat. Just do a sketch or pull out a calculator. True, but there is a change in grade, so we have steps on one side, and I did some future planning as well. For example, next year I hope to add a pergola. So I modeled that to see how it would all work out. Anyhow, it’s not like I was going to do it in AutoCAD or something…
So, on to the BIM part of the story. I needed to order materials so I needed quantities. Naturally, I could just pull out a calculator and a sketch pad and the formula for a circle. A little bit of quick math and you have the square footage, circumference, etc. Add 10% and off I go. In fact the guys at the home store I am sure would have done that for me no problem. But I wanted to have as accurate a count of each item as possible. So, what to do? Well how about a quick mock-up in the massing environment? Overkill? Maybe. But it turns out that in doing it this way, my numbers were almost dead on.
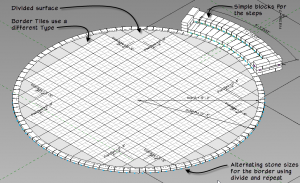
Building the model was pretty simple. A circular surface, divide the surface using a rectangular pattern. Next create a custom pattern-based family for the individual paver stones. (Side note: I used Hatch-22 to make the custom pattern you see in the image). I then selected the surface, and on the Properties palette, made sure that the Border Tiles used the “Partial” option. I created a new type for my pattern-based family that used a simple cross hatch and had a different name. This way, I could easily see which tiles needed to be cut, and how many cut tiles I would have. To apply this “cut” tile type, right click the divided surface and choose Select all border components. A nice side benefit is that this made visualization easier. Therefore it was easier to shift the pattern around to get it centered the way I wanted.
To build the steps, it was basically like building lego blocks for the side walls and just a generic model repeated along a curved path for the steps themselves. This made them easy to count for ordering. I could have devised a formula for this instead based on the volume, but since I would actually be laying each of these stones later in the field, I wanted to see them and understand how they all fit together. (I suspect that real masons would have a good laugh at my expense on that one, but I make no claim to be a “real” mason).
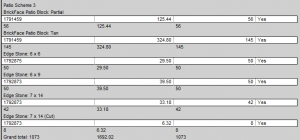
Building each stone made counting a breeze. Here is my list of materials:
The first two items on the list are the paver blocks. According to the counts, I needed 145 full pavers and 56 cut. This was 201 total. However I decided to order fewer than this (185 initially) since many of the cut tiles were quite small and I could get two from a single paver. During installation I damaged a couple, so I ended having to buy 4 more pavers. I used 189 total. If i had not broken or damaged any, I would have had two or three more. So my modified total was pretty much right on. Turns out I would have gotten really close to this number with the formula for the area of a circle as well. However, what the divided surface gave me over and above the count was the visualization benefits noted above. It was easier to shift the pattern and make design decisions by seeing the pattern on the surface as I worked. The count can be seen as a nice extra.
I’ll comment on the next two items on the list in a moment. The last two items on the list of materials were the larger stones for the stairs. The numbers shown worked pretty well and I ended up with one stone extra when the project was complete.
Finally, let me get to the part that gives this blog post its title: The edge stones. I wanted to do an alternating pattern of 6×6 and 6×9 stones along the circumference of the circle. Perfect job for divide and repeat. Create a circle, divide it, then create an adaptive family for one stone. Create two types, 6×6 and 6×9. Add one to one of the nodes, add the other to the other node. I think I had to add a few more to clue Revit into the pattern I wanted, but after a little trial and error, click the Repeat tool and presto! The pattern repeated around the entire circle. I also made sure that none of these needed cutting and that I never had two of the same kind next to each other (6×6, then 6×9, then 6×6, then 6×9, etc. all the way around the circle). Fiddling with the properties on the Properties palette mostly for this. I am not sure I could have worked this out so quickly without divide and repeat.
According to my paver list schedule above, I needed 50 of each size. So I ordered that exact amount.
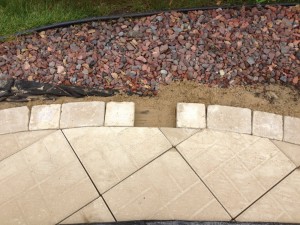
During installation, I began laying edge stones alternating as I went and went all the way around. When I got back to where I started, this is what I had:
NOT BAD. My count was off by one 6×9 stone. I went and bought one more stone, and it dropped into place and fit like a glove! no cutting and the pattern intact!
Now my little project here was just a simple home improvement project. But I am always pleased when I can put BIM concepts into practice first hand. No matter how small. The fact is, it did not take me all that long do the design in Revit. And even if it did take longer than what most folks would do for a similar project, I was able to try many variations ahead of time in the system before committing. And having it all work out exactly the way I planned meant much less rework, frustration and/or settling for sub par results in the field. Believe me, it is much less strenuous to move a mouse around than to lug around extra loads of gravel, stones and pavers.
Final thoughts: Every year I find myself reaching for Revit more for things I would have just sketched out by hand in the past. The same is true for Word and Excel actually. You will find far fewer paper notes on my desk. This is not necessarily because of a conscious goal to go paperless (although I do like the idea of paperless), rather it is an ever-improving ability to “think” with a digital pencil rather than a physical one. I am not knocking pencil and paper. I think any tool that gets the ideas flowing from your brain to paper or other sharable medium is a good thing. What I am saying is that if you are like me, you may sometimes tell yourself, “oh, I won’t fire up Revit for such a simple little thing, I’ll just do it in _____”. But each time I decide to ignore that impulse and fire up Revit anyhow, I usually find myself glad that I did.
So should you do your next home improvement project in Revit? I know I will be…
11 Responses to BIM-tastic
Comments are closed.
Categories
- Off Topic (1)
- Oddities (5)
- Book News (23)
- Video Training News (7)
- Speaking Engagements (5)
- Renaissance Revit (12)
- Off Topic (8)
- Revit Concepts (1)
- Project Soane (2)
- BIM After Dark (Revit Kid) (2)
- Tips and Tricks (29)


Paul:
I and my two employees use Revit to do all kinds of calculations to answer questions and quanties during construction. I personally use Revit to calculate quantities when we have questions, especially on our rehab projects. I am surprised that this is new to you. BTW, I have had a Wacom Cintiq monitor for 12 years. With its stylus, I have eliminated pencils. Remember, that I have been designing or building buildings for 40 years.
ED Goldberg A.I.A. NCARB
HEGRA Architects LLC
www. hegra.org
Author of the Revit books used by ITT tech Institute.
Hi Ed:
Thanks for the comment. Just to clarify, this is not new to me, I just got to that last stone at the edge and felt compelled to write a post about it. I have been using Revit (and AutoCAD before that) this way for many years.
paul
Paul,
It’s your personal and practical application of Technology that adds real depth to your writing. Nice job. I did my patio garden in AutoCAD. It’s nice to see accurate results from a design that, yeah I could’ve done it on a paper bag but, CAD works even on the small projects.
Hi Erich:
Exactly my point. Thanks for the comment. I think its funny when we use this technology in our offices every day and then come home and pull out a paper bag as you say for the honey-do list. CAD and BIM don’t care how big or small the project is.
paul
Nice use of BIM, Paul.
Are the grill and bar families going to be Generic models or Specialty Equipment?
HA! Always a good point of discussion. In this case, I did not build those items. I did build the fire pit and made it a generic model. I use a simple shared yes/no parameter to control which schedules generic models appear on. Filter by the Yes/No and you can leave off certain items from the schedule. Works OK. But I would still love to see some new categories get added at some point…
Great article. I love how simply you describe your workings – it encourages me to pursue BIM.
I’m going to cite this article in my thesis as proof of BIM’s effectiveness, even for simple tasks such as this. I hope this is okay with you, Paul?
Kind Regards,
Jordan
Perfectly fine with me. Just a link back to the website would be great. Thanks and good luck with your thesis.
[…] Paul F. Aubin BIM’s his Patio […]
Hi Paul,
Great article leveraging a straight-forward simple demonstration of methods that may be utilized in even the most complex projects.
Imagine my dismay at not being able to figure out where you spent all the extra time and money that constitutes the “extra expense to do BIM”. I read on so many other posts and blogs about attempts to justify all the extra work for BIM. Where are they? 🙂
Did it cost you more time to figure out how to balance the pavers in the patio field to minimize the number of cuts? Was it faster digitally than in the field? How could it be as accurate? 8)
I am sure all the time you took to figure out the perimeter was wasted. Heck, why not just order a bunch extra and figure it out in your yard?
Seriously though, thank you. I plan to point this article out many times as an example of reality.
Regarding your one 6×9 that you were “short”. I contend that if you would have had access to a Total Station or some other layout tool that could have harnessed your digital model to assist you in the actual field layout, you would not have been short. All it would take is an occasional 20mm bump out in the final diameter to cause the variation.
Hi Steve:
Thanks for the great comments. I do almost all of the home improvement in my own house myself and with the help of a good friend.
There really isn’t “extra expense” of doing BIM for me. To me it is just the way to do it. I think that spending time on the computer trying alternatives and ruling out issues is much better spent than wasting time in the field doing something and discovering the hard way that it doesn’t work. At that point your only choices are to live with it or tear it out and do it again. Neither of these are great options. So in with the patio, figuring out the cuts for example made it easier for me to know not only how much material I actually needed to buy, but also since it was circular, keeping all the cuts symetrical was important to me and the look I wanted as well. It is really easy to shift everything to right or left a couple inches on screen and pretty much a back-breaker to do it in the field. And as sore as my back was when it was finished, saving any excess time heaving and cutting was very much welcomed.
So did it take more time to plan it out on the computer using BIM than it would have with a sketch pad and calculator? It sure did, but for me it is totally worth it. I am certain that I would not have gotten the same quality result any other way. Of course, as you point out, I don’t have a total station, so I cannot comment on that…
Now, if I was not doing the installation work myself, would I still plan it out in BIM? Probably. It just makes sense to me. But it can be a tough value proposition for some. I always try to encourage folks to compare the process of BIM to their existing workflow and look for areas where they add value to their own work, not just those downstream. Adding value is not always time or cost savings, but sometimes process improvement and better quality work (which you could certainly argue does translate into savings…) But each individual or firm has to do this analysis for themselves. Like so many things the trick is to work smarter not necessarily harder. When implemented carefully, that is exactly what BIM can do. But of course it is always possible for it to go the other way as well…