Get control of your Revit Sheets
Sometimes setting up your sheets in a Revit project can be a real chore. Do you know which views are already on sheets somewhere in your set? Is your sheets browser branch organized in the best way to display and locate the sheets you need? Are your viewport titles located where and how you like them? Addressing these issues is simpler than you think.
Is my view on a sheet?
Let’s start with the views in your browser. How do you know if they are already on a sheet somewhere in the set? If you are interested in a particular view, simply right-click it on the Project Browser. If it is on a sheet already, the “Open Sheet” item will be available. Choose that menu item to go to the corresponding sheet. If “Open Sheet” is grayed out, then the view is not on a sheet.
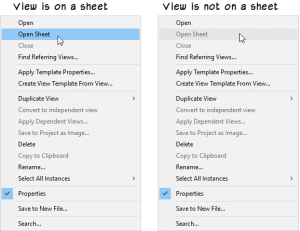
Right-click a view to see if it is on a sheet
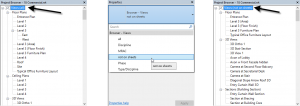
This technique is effective for individual views, but it can be tedious to right-click each view. So if you want to see all of the views that are not yet on sheets, there is a built-in browser organization type for this purpose. Start by selecting the top branch of the browser list. It is called “Views” and will have the name of the current organization type next to it in parenthesis. For example, the default organization type is called “all,” so if this one is active, you would select: Views (all).
On the Properties palette, from the Type Selector, choose: not on sheets. This will filter out all of the views from the list that are already on sheets showing only those that are not yet on a sheet.
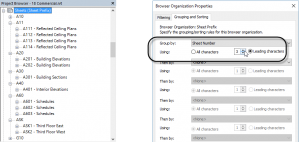
To understand what is happening here, you can right-click the Views (not on sheets) branch of the browser and choose: Browser Organization. Edit this and you will see that on the Filtering tab, the list is being filtered to include only those views whose sheet name is equal to “none.” In other words, those views that are not on a sheet.

Customizing Viewport Properties
Knowing which views are on sheets is useful, but what about customizing the sheet itself? Let’s consider the viewports. When you drop a view on a sheet, it is displayed in a viewport on the sheet. Did you know that this viewport is like other Revit elements and it has editable properties? You can select it onscreen, and then on the Properties palette, you can see and modify its settings. The properties displayed directly on the Properties palette are the same properties you would see if you edited the properties of the view on the Project Browser. In other words, if you have a plan view in the viewport, you will see the scale, the plan’s level associations, if it has an underlay, etc. If it is an elevation view, you would see properties like far clipping and far clip offset.
If you click Edit Type while a viewport is selected, you will be editing the settings of the viewport type, not the view type. So here you will see options to control how the view title behave. So as we would do with other elements, it is a good idea to duplicate the type before editing. Once you have a duplicate and named it, you can change how the title behave. You can turn them off entirely if you don’t want a view title, or a really interesting setting is the “When multiple viewports” option.
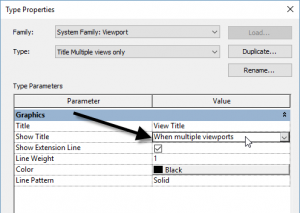
With this option, a view title will not be displayed when a sheet has only one viewport. But as soon as you add a second viewport to the sheet, the titles will appear beneath both views. This is useful when you include the title directly in your titleblock and don’t want the sometimes redundant title beneath the viewport itself.
So now you have gained control over when you want titles to display, but how about where they display relative to the viewport and how long they are? (Well, the second part of that question only applies when you choose the “Show Extension Line” option). The tricky part about view titles (and extension lines), is you have to know how to select them to move or resize them.
- If you select and then drag the viewport, the view title remains attached and moves with it.
- If however, you select the view title directly (not the viewport, but directly on the view title) then you will be moving only the view title. This is how you move it to a different location relative to its parent viewport.
- If you want to resize the view title, control handles will appear at the ends only when you select the viewport, not when selecting the view title directly.
Confusing? It can be. So, I recommend selecting the viewport, resize the view title with the control handles if desired and move the viewport to where you want it. The view title will also move. Then deselect the viewport, click directly on the view title and move it where you want to fine-tune.
And how about taming that long list of sheets?
At the start of this article, I pointed out the built-in “not on sheets” browser organization type. I also mentioned how you can customize it if desired. Well it turns out that you can do the same sort of customization to the Sheets branch of the browser. I go through the complete steps in this week’s tip in in: Revit Tips, Tricks and Troubleshooting in the lynda.com library. You can view it here:
Categories
- Off Topic (1)
- Project Soane (2)
- BIM After Dark (Revit Kid) (2)
- Tips and Tricks (29)
- Oddities (5)
- Book News (23)
- Video Training News (7)
- Speaking Engagements (5)
- Renaissance Revit (12)
- Off Topic (8)
- Revit Concepts (1)
Comments are closed.